Integrating with Android Apps
Rock helps you package your React Native code into files that your iOS and Android apps can use. For Android, it creates an .aar file that you can easily add to your app.
To add React Native to your Android app, we'll package your React Native code into an AAR. This way, you don't need to set up Node.js in your main app. Here's how to do it:
Creating a New Rock Project (Automated)
If you are creating a new Rock project, you can select the brownfield-android plugin:
> npm create rock
...
◆  What plugins do you want to start with?
│  ◼ brownfield-android
to add brownfield capabilities, install dependencies. Then jump to:
Integrating to An Existing Rock Project (Manual)
If you have an existing Rock project, follow the instructions below.
1. Create a New Android Library Module
First, we'll create a new Android Library module in your React Native project. This module will contain your React Native UI and provide APIs for loading it in your native Android app.
-
Open your React Native project's android folder in Android Studio
-
Go to File → New Module → Android Library and create a new module:
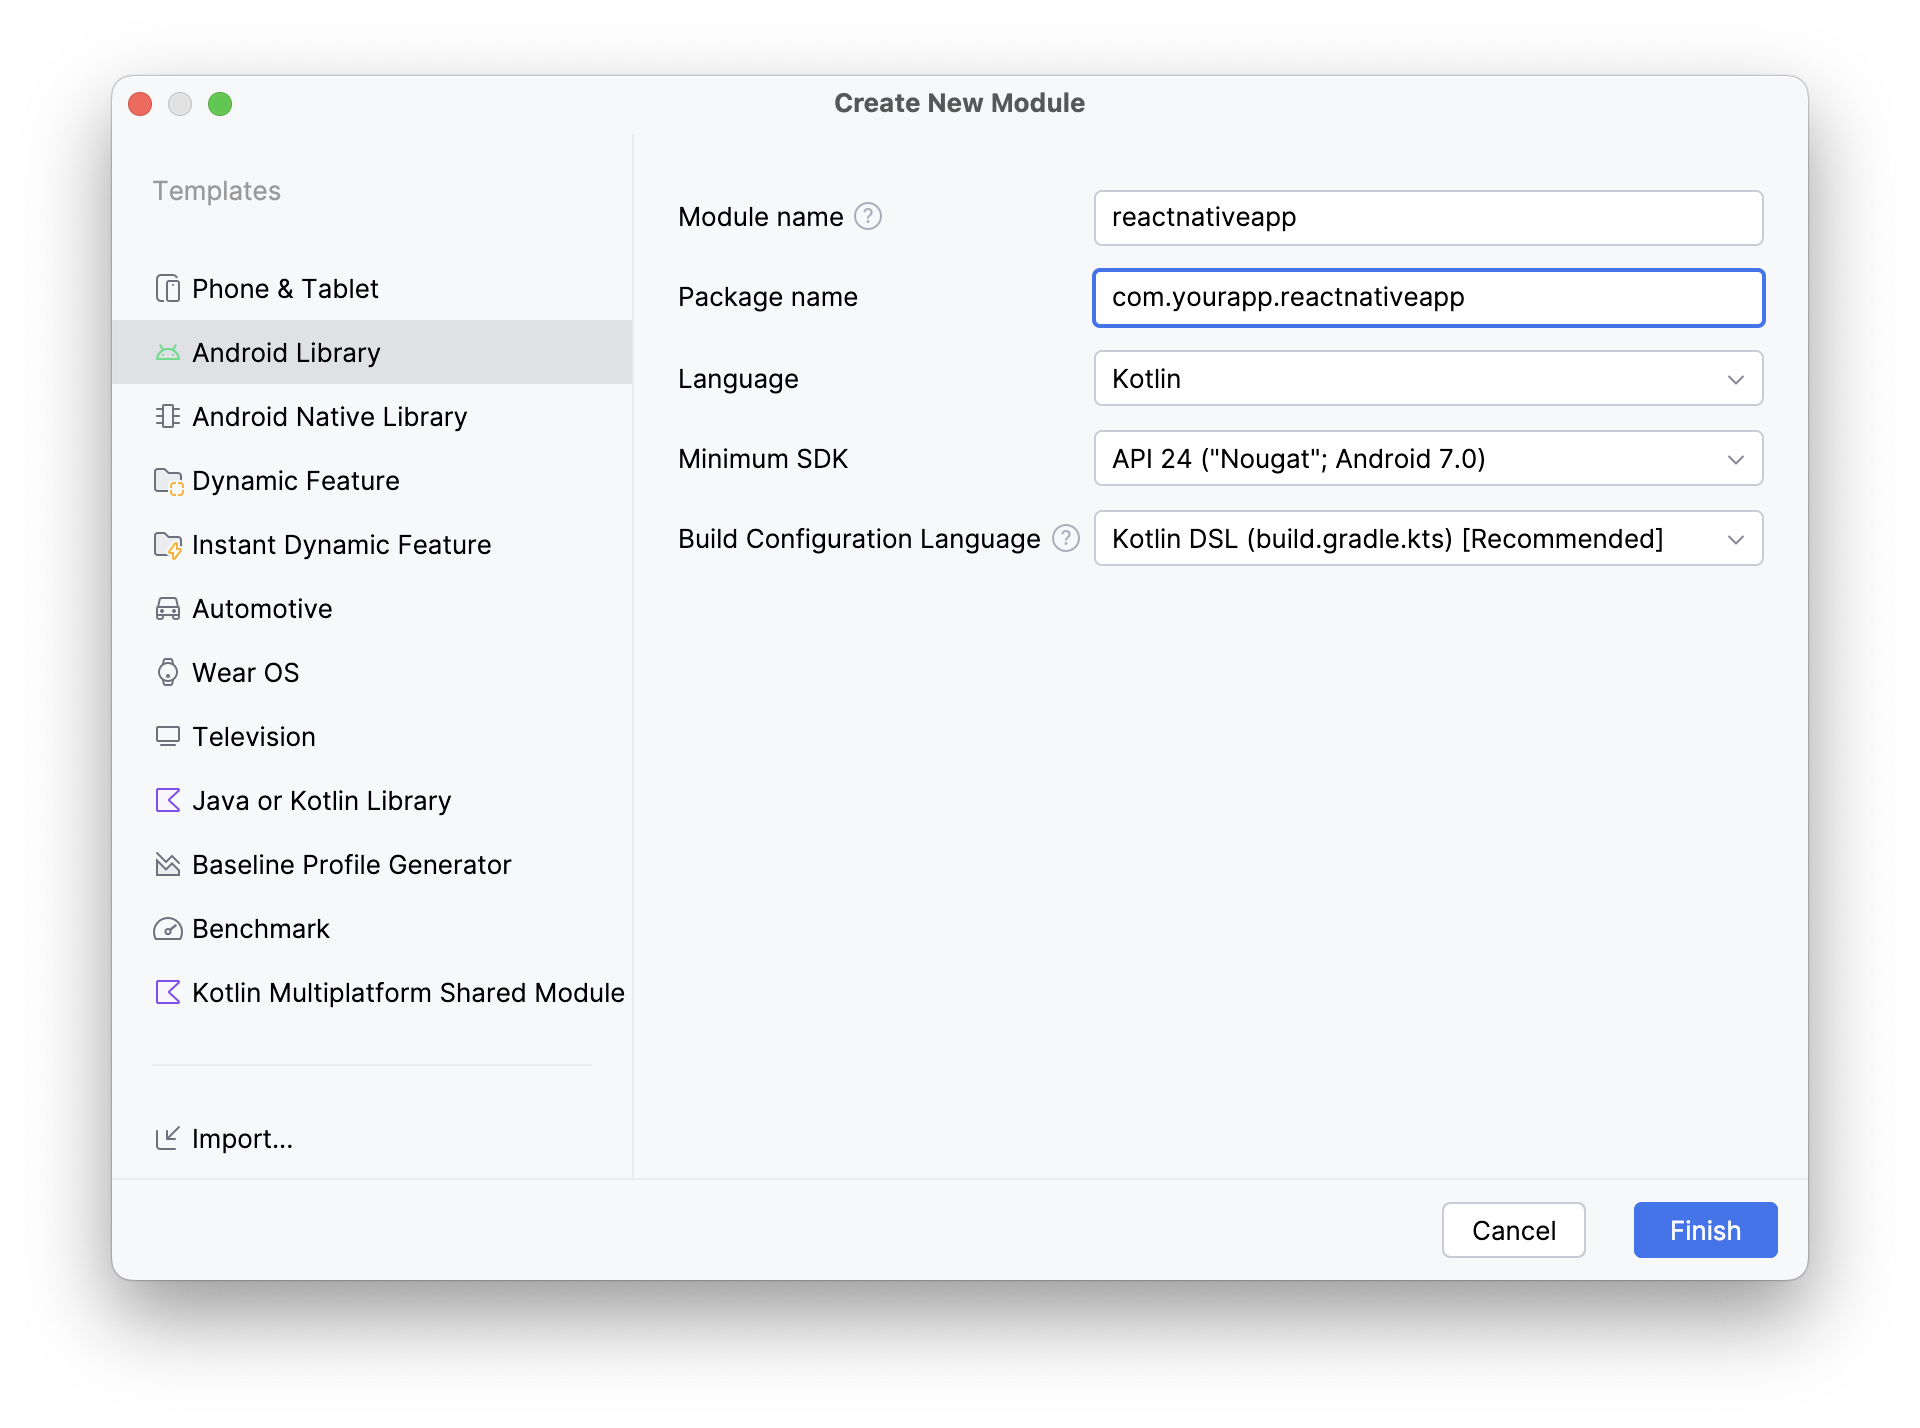
Module Naming
For the sake of this tutorial we use module name reactnativeapp in the com.yourapp app.
Please, adjust the name of the app and the module to your preferences and make sure to update the code snippets presented below accordingly.
-
After the sync completes, run your React Native app to make sure everything works
-
Test the build by running ./gradlew assembleRelease in the android directory
2. Set Up the AAR Gradle Plugin
We need a special Gradle plugin to create an AAR that includes all dependencies. We'll use the brownfield-gradle-plugin.
-
Add the gradle plugin dependency to your android/build.gradle:
android/build.gradle
buildscript {
    repositories {
        google()
        mavenCentral()
    }
    dependencies {
        classpath("com.callstack.react:brownfield-gradle-plugin:0.6.2") // check the latest version: https://mvnrepository.com/artifact/com.callstack.react/brownfield-gradle-plugin
    }
}
-
Add the plugin to your reactnativeapp/build.gradle.kts:
reactnativeapp/build.gradle.kts
plugins {
    id("com.android.library")
    id("org.jetbrains.kotlin.android")
    id("com.facebook.react")
    id("com.callstack.react.brownfield")
}
-
Add autolinking setup to the react block in reactnativeapp/build.gradle.kts:
reactnativeapp/build.gradle.kts
react {
    autolinkLibrariesWithApp()
}
After adding these, sync your project and run ./gradlew assembleRelease to verify everything works.
3. Add React Native Dependencies
Add the required React Native dependencies to your reactnativeapp/build.gradle.kts:
reactnativeapp/build.gradle.kts
dependencies {
    // Match your version of React Native, here 0.83:
    api("com.facebook.react:react-android:0.83.0")
    // For React Native 0.83 or newer use:
    api("com.facebook.hermes:hermes-android:0.14.0")
    // For React Native 0.82 or older use:
    // api("com.facebook.react:hermes-android:0.82.0")
}
After adding these, sync your project and run ./gradlew assembleRelease to verify everything works.
4. Add React Native Brownfield
Here we add the react-native-brownfield library to help us with APIs required to initialize and present react-native views.
npm install @callstack/react-native-brownfield
yarn add @callstack/react-native-brownfield
pnpm add @callstack/react-native-brownfield
bun add @callstack/react-native-brownfield
deno add npm:@callstack/react-native-brownfield
Compatibility Matrix
Our default brownfield template uses the latest version of @callstack/react-native-brownfield (currently v2).
5. Create React Native Host Manager
Create a new file called ReactNativeHostManager.kt in your reactnativeapp module:
Info
The loadReactNative call is only required if you're on React Native version >= 0.80.0.
If you're on lower version, skip it.
package com.yourapp.reactnativeapp // If you used a different package name when creating the library, change it here

import android.app.Application
import com.callstack.reactnativebrownfield.OnJSBundleLoaded
import com.callstack.reactnativebrownfield.ReactNativeBrownfield
import com.facebook.react.PackageList
import com.facebook.react.ReactNativeApplicationEntryPoint.loadReactNative

object ReactNativeHostManager {
    fun initialize(application: Application, onJSBundleLoaded: OnJSBundleLoaded? = null) {
        loadReactNative(application) // Only required if you're on RN version >= 0.80.0

        val packageList = PackageList(application).packages
        ReactNativeBrownfield.initialize(application, packageList, onJSBundleLoaded)
    }
}
Here, we wrap the react-native-brownfield API in our own ReactNativeHostManager so that the native App only have to pass an
Application instance and not interact with any react-native API directly. See more
6. Populate Build Config:
Add build configuration fields:
reactnativeapp/build.gradle.kts
android {
    defaultConfig {
        minSdk = 24

        buildConfigField("boolean", "IS_EDGE_TO_EDGE_ENABLED", properties["edgeToEdgeEnabled"].toString())
        buildConfigField("boolean", "IS_NEW_ARCHITECTURE_ENABLED", properties["newArchEnabled"].toString())
        buildConfigField("boolean", "IS_HERMES_ENABLED", properties["hermesEnabled"].toString())
    }

    publishing {
        multipleVariants {
            allVariants()
        }
    }
}
Add the Maven publish plugin to your reactnativeapp/build.gradle.kts:
reactnativeapp/build.gradle.kts
plugins {
    id("com.android.library")
    id("org.jetbrains.kotlin.android")
    id("com.facebook.react")
    id("com.callstack.react.brownfield")
    `maven-publish`
}
Configure the publishing settings:
reactnativeapp/build.gradle.kts
import groovy.json.JsonOutput
import groovy.json.JsonSlurper

publishing {
    publications {
        create<MavenPublication>("mavenAar") {
            groupId = "com.yourapp"
            artifactId = "reactnativeapp"
            version = "0.0.1-local"
            afterEvaluate {
                from(components.getByName("default"))
            }

            pom {
                withXml {
                    /**
                     * As a result of `from(components.getByName("default")` all of the project
                     * dependencies are added to `pom.xml` file. We do not need the react-native
                     * third party dependencies to be a part of it as we embed those dependencies.
                     */
                    val dependenciesNode = (asNode().get("dependencies") as groovy.util.NodeList).first() as groovy.util.Node
                    dependenciesNode.children()
                        .filterIsInstance<groovy.util.Node>()
                        .filter { (it.get("groupId") as groovy.util.NodeList).text() == rootProject.name }
                        .forEach { dependenciesNode.remove(it) }
                }
            }
        }
    }

    repositories {
        mavenLocal() // Publishes to the local Maven repository (~/.m2/repository by default)
    }
}

val moduleBuildDir: Directory = layout.buildDirectory.get()

/**
 * As a result of `from(components.getByName("default")` all of the project
 * dependencies are added to `module.json` file. We do not need the react-native
 * third party dependencies to be a part of it as we embed those dependencies.
 */
tasks.register("removeDependenciesFromModuleFile") {
    doLast {
        file("$moduleBuildDir/publications/mavenAar/module.json").run {
            val json = inputStream().use { JsonSlurper().parse(it) as Map<String, Any> }
            (json["variants"] as? List<MutableMap<String, Any>>)?.forEach { variant ->
                (variant["dependencies"] as? MutableList<Map<String, Any>>)?.removeAll { it["group"] == rootProject.name }
            }
            writer().use { it.write(JsonOutput.prettyPrint(JsonOutput.toJson(json))) }
        }
    }
}

tasks.named("generateMetadataFileForMavenAarPublication") {
   finalizedBy("removeDependenciesFromModuleFile")
}
8. Set up Rock for AAR generation
Warning
If you're integrating an Expo app with Expo CLI instead of Rock, skip this step.
-
Add @rock-js/plugin-brownfield-android to your dependencies
-
Update your rock.config.mjs:
rock.config.mjs
import { pluginBrownfieldAndroid } from '@rock-js/plugin-brownfield-android';

export default {
  plugins: [pluginBrownfieldAndroid()],
};
9. Create the AAR
Warning
If you're integrating an Expo app with Expo CLI instead of Rock, skip this step.
-
Run this command to generate the final AAR:
Terminal
rock package:aar --variant Release --module-name reactnativeapp
-
Once the AAR is created, publish it to local Maven registry to be consumable by the native app:
Terminal
rock publish-local:aar --module-name reactnativeapp
10. Extra steps for Expo CLI and Expo Modules
- Make
ReactNativeHostManager aware with expo modules:
@@ -3,13 +3,30 @@
+import android.app.Application
+import android.content.res.Configuration
 import com.callstack.reactnativebrownfield.OnJSBundleLoaded
 import com.callstack.reactnativebrownfield.ReactNativeBrownfield
 import com.facebook.react.PackageList
+import com.facebook.react.ReactHost
 import com.facebook.react.ReactNativeApplicationEntryPoint.loadReactNative
+import expo.modules.ApplicationLifecycleDispatcher
+import expo.modules.ExpoReactHostFactory

 object ReactNativeHostManager {
     fun initialize(application: Application, onJSBundleLoaded: OnJSBundleLoaded? = null) {
         loadReactNative(application)

-        val packageList = PackageList(application).packages
-        ReactNativeBrownfield.initialize(application, packageList, onJSBundleLoaded)
+        ApplicationLifecycleDispatcher.onApplicationCreate(application)
+
+        val reactHost: ReactHost by lazy {
+            ExpoReactHostFactory.getDefaultReactHost(
+                context = application.applicationContext,
+                packageList = PackageList(application).packages,
+            )
+        }
+
+        ReactNativeBrownfield.initialize(application, reactHost, onJSBundleLoaded)
     }
+
+    fun onConfigurationChanged(application: Application, newConfig: Configuration) {
+        ApplicationLifecycleDispatcher.onConfigurationChanged(application, newConfig)
+    }
 }
- Update your
reactnativeapp/build.gradle:
+ reactBrownfield {
    /**
     * This is available from `com.callstack.react.brownfield` version > 0.3.0
     * It takes care of linking expo dependencies like expo-image with your AAR module.
     *
     * Default value is false.
     */
+     isExpo = true
+ }

react {
    autolinkLibrariesWithApp()
}

@@ -76,6 +76,18 @@ dependencies {
     androidTestImplementation("androidx.test.espresso:espresso-core:3.6.1")
 }

/**
* This function is used in the places where we:
*
* Remove the `expo` dependency from the `module.json` and `pom.xml file. Otherwise, the
* gradle will try to resolve this and will throw an error, since this dependency won't
* be available from a remote repository.
*
* Your AAR does not need this dependency.
*/
+ fun isExpoArtifact(group: String, artifactId: String): Boolean {
+     return group == "host.exp.exponent" && artifactId == "expo"
+ }

 publishing {
     publications {
@@ -97,7 +109,12 @@ publishing {
                     val dependenciesNode = (asNode().get("dependencies") as groovy.util.NodeList).first() as groovy.util.Node
                     dependenciesNode.children()
                         .filterIsInstance<groovy.util.Node>()
-                        .filter { (it.get("groupId") as groovy.util.NodeList).text() == rootProject.name }
+                        .filter {
+                            val artifactId = (it["artifactId"] as groovy.util.NodeList).text()
+                            val group = (it["groupId"] as groovy.util.NodeList).text()
+
+                            (isExpoArtifact(group, artifactId) || group == rootProject.name)
+                        }
                         .forEach { dependenciesNode.remove(it) }
                 }
             }
@@ -121,7 +138,12 @@ tasks.register("removeDependenciesFromModuleFile") {
         file("$moduleBuildDir/publications/mavenAar/module.json").run {
             val json = inputStream().use { JsonSlurper().parse(it) as Map<String, Any> }
             (json["variants"] as? List<MutableMap<String, Any>>)?.forEach { variant ->
-                (variant["dependencies"] as? MutableList<Map<String, Any>>)?.removeAll { it["group"] == rootProject.name }
+                (variant["dependencies"] as? MutableList<Map<String, Any>>)?.removeAll {
+                    val module = it["module"] as String
+                    val group = it["group"] as String
+
+                    (isExpoArtifact(group, module) || group == rootProject.name)
+                }
             }
             writer().use { it.write(JsonOutput.prettyPrint(JsonOutput.toJson(json))) }
         }
That is all you need to change. Step 8.i is not required with Expo, you can skip it. See Step 8.ii to generate AAR.
- Generate AAR when using Expo
Here you can see how to generate AAR. The link uses a script which first builds the AAR and then publish to to mavenLocal.
see here
11. Add the AAR to Your Android App
Note: You'll need an existing Android app or create a new one in Android Studio.
-
Add mavenLocal() to your app's dependency resolution in settings.gradle.kts:
settings.gradle.kts
 dependencyResolutionManagement {
     repositories {
         mavenLocal()
     }
 }
-
Add the dependency to your app's build.gradle.kts:
build.gradle.kts
dependencies {
    implementation("com.yourapp:reactnativeapp:0.0.1-local")
}
-
Initialize React Native in your MainActivity:
import com.yourapp.reactnativeapp.ReactNativeHostManager

class MainActivity : AppCompatActivity() {
    override fun onCreate(savedInstanceState: Bundle?) {
        super.onCreate(savedInstanceState)
        ReactNativeHostManager.initialize(this.application) {
             println("JS bundle loaded")
        }
        // ... rest of your onCreate code
    }
}
12. Show the React Native UI
Add a button to your activity_main.xml:
<Button
    android:id="@+id/show_rn_app_btn"
    android:layout_width="wrap_content"
    android:layout_height="wrap_content"
    android:text="Show RN App"
    app:layout_constraintBottom_toBottomOf="parent"
    app:layout_constraintEnd_toEndOf="parent"
    app:layout_constraintStart_toStartOf="parent"
    app:layout_constraintTop_toTopOf="parent" />
Update your MainActivity to show the fragment:
import com.yourapp.reactnativeapp.ReactNativeHostManager
import com.callstack.reactnativebrownfield.ReactNativeFragment

class MainActivity : AppCompatActivity() {
    private lateinit var showRNAppBtn: Button

    override fun onCreate(savedInstanceState: Bundle?) {
        super.onCreate(savedInstanceState)
        ReactNativeHostManager.initialize(this.application) {
            println("JS bundle loaded")
        }

        val rnAppFragment = ReactNativeFragment.createReactNativeFragment("BrownFieldTest")
        showRNAppBtn = findViewById(R.id.show_rn_app_btn)
        showRNAppBtn.setOnClickListener {
            supportFragmentManager
                .beginTransaction()
                .replace(R.id.fragmentContainer, rnAppFragment)
                .commit()
        }
    }
}
Now you can run your app and test the React Native integration!
Optional:
If you want to get react-native in a View instead of a Fragment, you can use the following API:
val rnView = ReactNativeBrownfield.shared.createView(this.applicationContext, this, "BrownFieldTest")
The above returns a FrameLayout, which can be used to present React Native as a View. This is most suitable in situations where you want to present individual pieces of React Native UI. For example, if you're building a native design system library in React Native, or you want to export a component (such as a Card component) to share between React Native and the native app.
Note: brownfield-gradle-plugin copies .so files to the lib folder. Make sure to add **/*.so to your .gitignore file, as to not commit these .so files. The reason is they are auto-generated each time.
Troubleshooting
React Native Reanimated v4 duplicate libworklets.so library conflict
Both react-native-reanimated and react-native-worklets packages include the native library libworklets.so. When building an AAR with the brownfield Gradle plugin, this duplication causes build conflicts on Android.
To resolve this, exclude libworklets.so from the packaging process by patching react-native-reanimated - specifically, add libworklets.so to the exclusion list in android/build.gradle of react-native-reanimated:
diff --git a/android/build.gradle b/android/build.gradle
--- a/android/build.gradle
+++ b/android/build.gradle
@@ -252,6 +252,7 @@ android {
                 "**/libreact_render*.so",
                 "**/librrc_root.so",
                 "**/libjscexecutor.so",
+                "**/libworklets.so",
         ]
     }
     compileOptions {
This prevents the duplicate library from being included in the AAR, resolving the build conflict.